How to set up a mail server in Debian and Ubuntu with ispmanager to protect against spam
Here are some methods for creating and configuring a secure mail server on Linux Debian 11 Bullseye. The main focus is on anti-spam tools such as Greylisting, DNSBL, and SpamAssassin.
Recommend system requirements:
1. Processor: a dual-core processor with a clock speed of 2.0 GHz or higher.
2. RAM: 2 GB RAM minimum (4 GB or more are recommended for better performance).
3. Hard drive: 20 GB of free drive space (SSD is recommended for better performance).
4. Network interface: 100 Mbps or more to ensure a stable connection to the Internet.
5. Internet access: constant access to the Internet for updates and server management.
6. Administrative Rights: the authority to install and configure the software.
This article will also be useful for anyone who uses Ubuntu 22.04 LTS (Jammy Jellyfish), Ubuntu 20.04 LTS (Focal Fossa), or Debian 10 (Buster).
We’ll go over:
- How to install Exim and Dovecot
- Creating a mail domain and e-mail
- Configuring DNS and rDNS records and smtp_banner
- Spam protection
We’ll create the mail server from the following software components:
- The ispmanager lite control panel.
- The Exim mail transfer agent (MTA), chosen due to its reliability and customization options.
- Dovecot is an IMAP/POP3 server. It supports various authentication and encryption methods to increase the security of the mail server.
How to install Exim and Dovecot
In this chapter, we will cover the process of installing Exim and Dovecot using ispmanager, which greatly simplifies the installation and configuration of mail services.
Exim Installation:
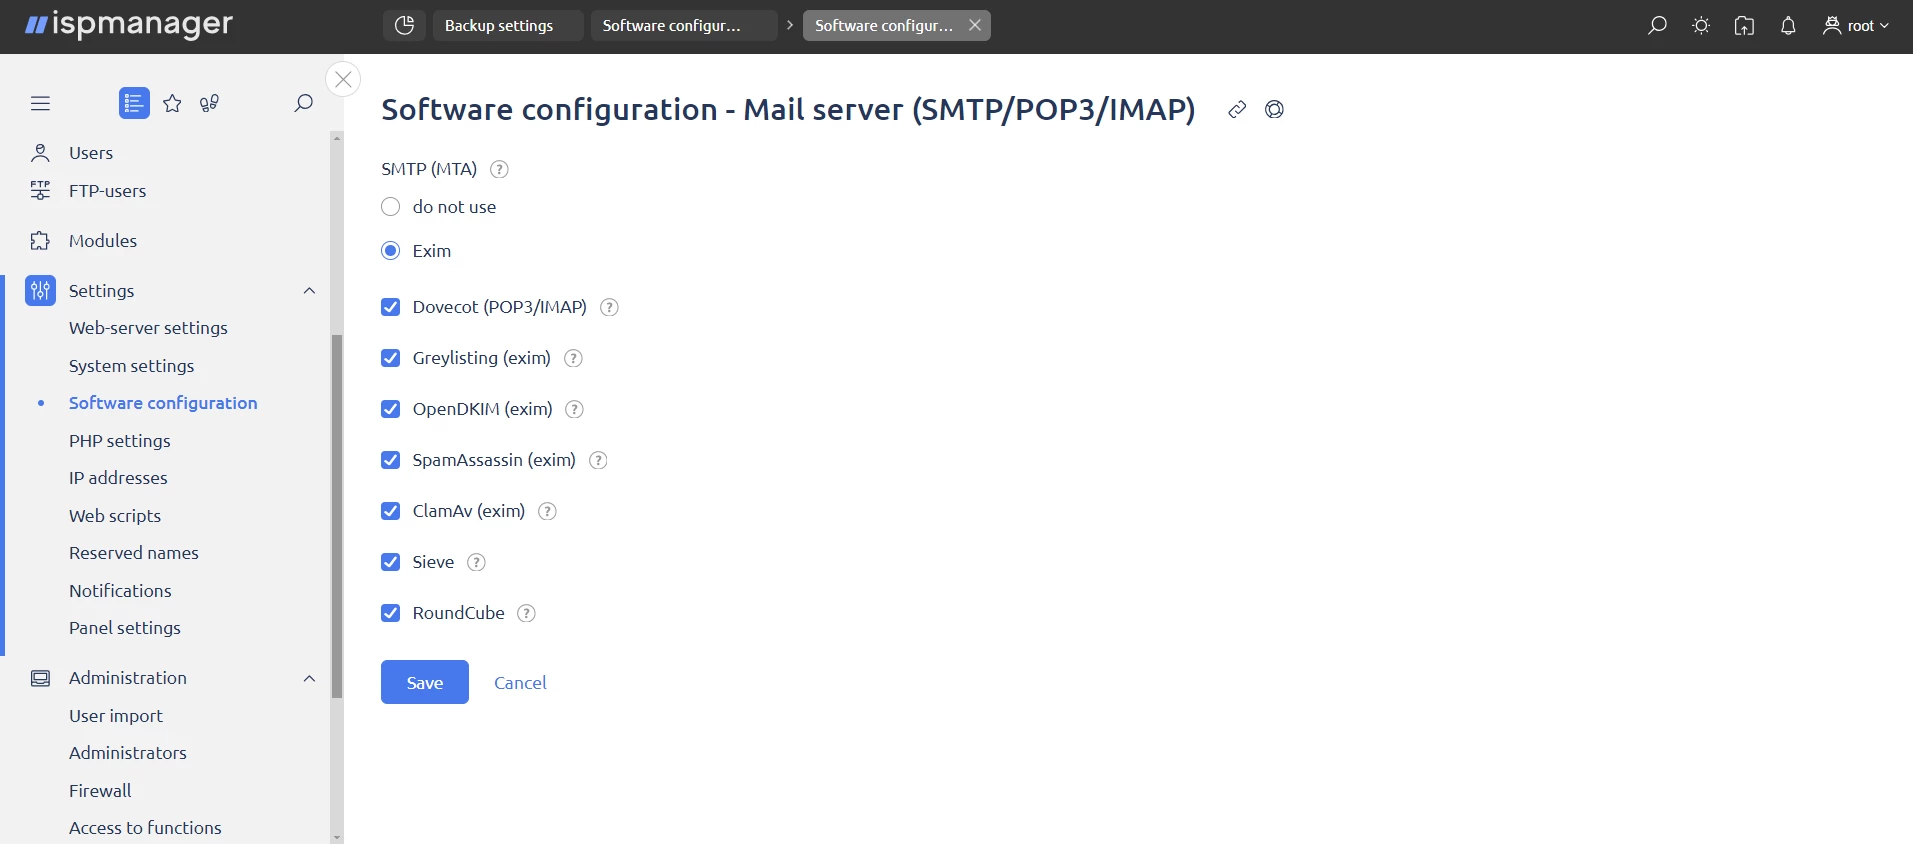
1. Go to "Settings" → "Software Configuration" → select "Mail Server" (SMTP/POP3/IMAP) → click "Change".
2. For installation type, select SMTP Server (MTA) – Exim. When installing Exim, the configuration template from /usr/local/mgr5/etc/templates/exim.config is copied into its directory and customized.
Dovecot Installation:
1. Go to “Settings” → “Software Configuration” → select “Dovecot” (POP3/IMAP).
2. Select these additional packages:
- Greylisting
- OpenDKIM
- SpamAssassin
- ClamAv
- Sieve
- RoundCube
3. Click "Apply Changes" and wait for the installation to complete.
What the add-on packages accomplish:
Greylisting is an anti-spam technique that temporarily postpones accepting emails from unfamiliar senders. This reduces the volume of spam because spammers usually don’t send more than once.
OpenDKIM is an email authentication tool for verifying that an email received was actually sent from a specified domain and not altered during transmission. This helps prevent phishing and sender spoofing.
SpamAssassin is a powerful anti-spam filter that analyzes the content of emails and assigns them a score based on a diverse set of criteria. Messages with a high score are marked as spam, which helps to reduce the volume of junk mail.
ClamAV is an antivirus program for scanning incoming and outgoing mail for malware. It integrates with Exim and provides an additional layer of protection.
Sieve is a mail sorter that allows you to create rules to handle incoming mail. It integrates with Exim and Dovecot mail servers. In ispmanager, Sieve automatically filters and sorts emails in mailboxes. For example, you can set up a rule so that all emails with a certain keyword automatically show up in the "Important" folder. This helps organize mail and reduces the load on your mailbox.
RoundCube is a web interface for accessing your mail. RoundCube makes it easy to work with e-mail from a browser, including managing e-mails, your address book, and mailbox settings.
Creating a mail domain and e-mail
Let’s go over how to create a mail domain and email in ispmanager 6.
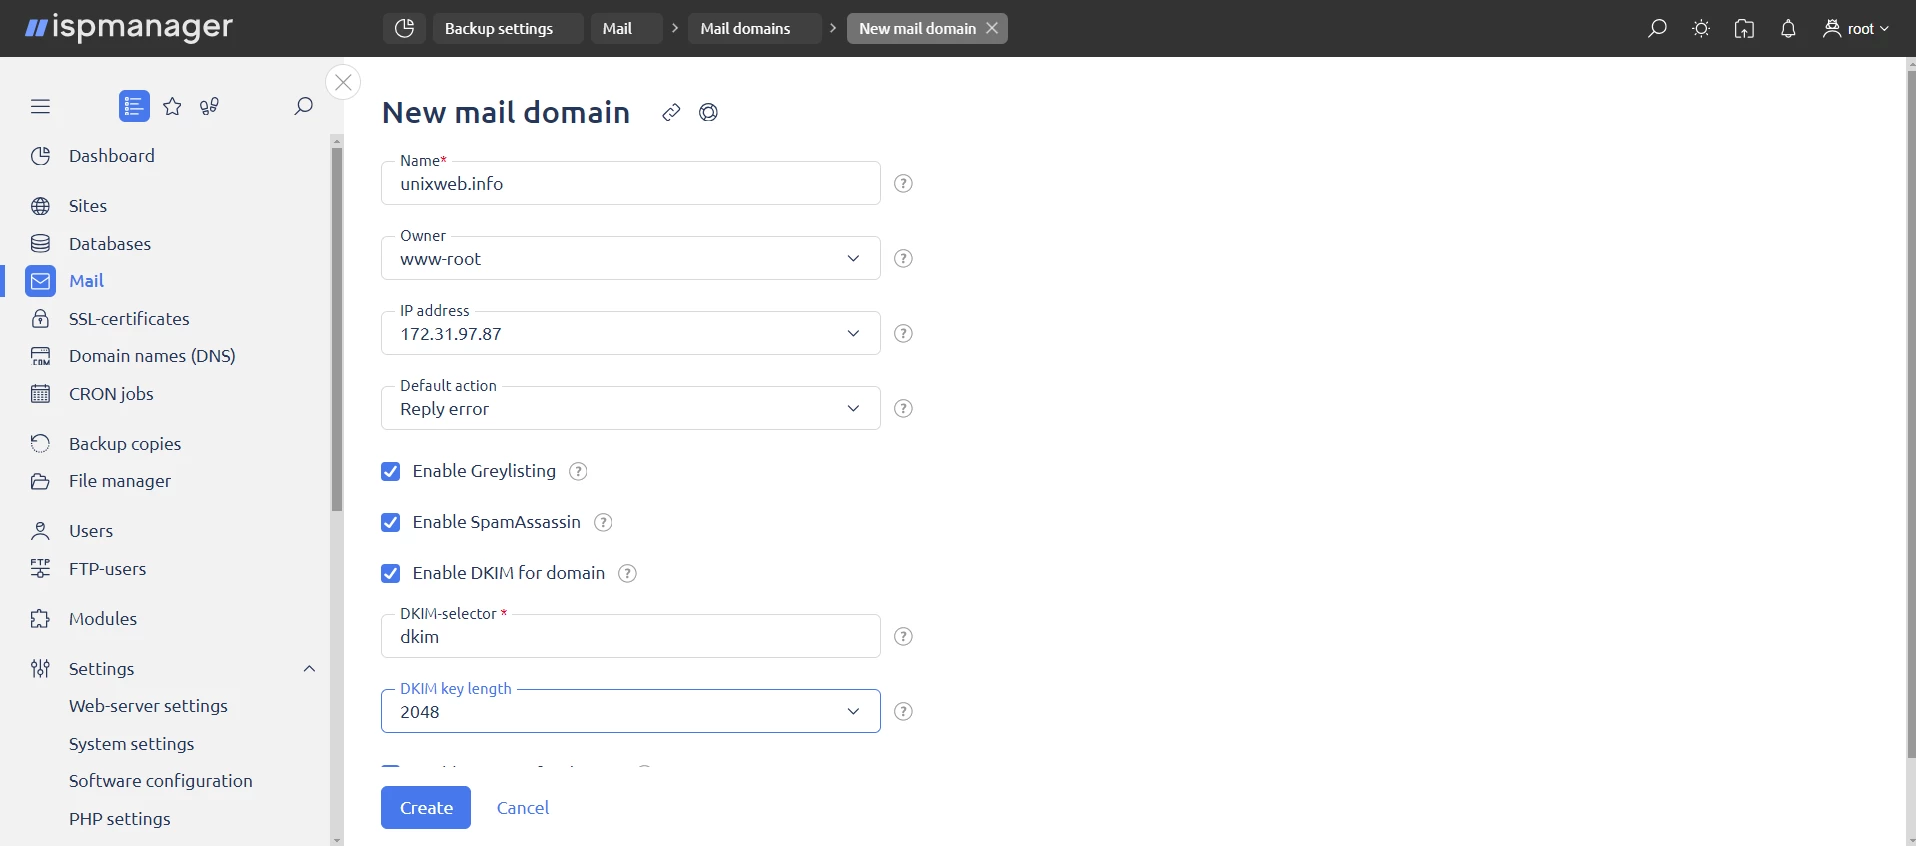
Creating a Mail Domain:
1. Go to the Mail section and select Mail Domains.
2. Fill in the form fields: domain name and default settings.
3. Find out more in the documentation: creating a mail domain →
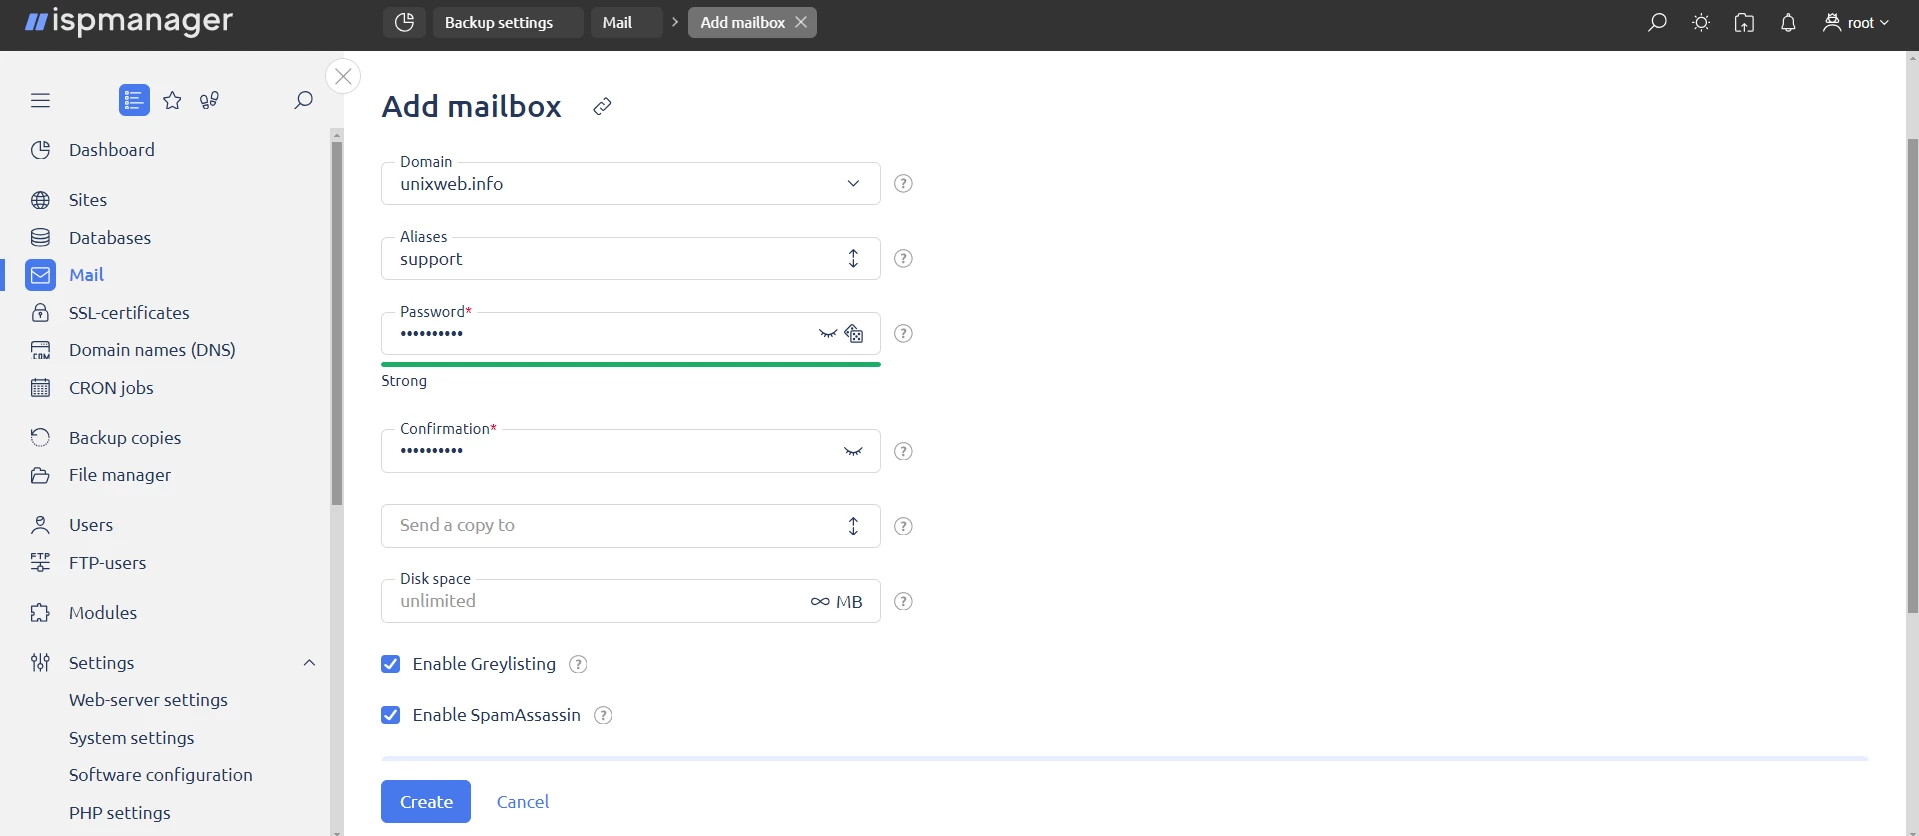
Creating a mailbox:
1. Go to the Mailboxes section and create a new mailbox.
2. Fill in the form fields: specify the owner, password, and other parameters.
3. Find out more in the documentation: creating a mailbox →
Creating a mail domain. Setting up DNS, rDNS records, and smtp_banner
In this chapter, we will look at why correct DNS records are important and how to configure A-, MX-, SPF-, DKIM-, and rDNS records for a mail server. We’ll also cover how best to configure smtp_banner
Correct DNS records ensure reliable mail delivery, minimize rejections, and prevent emails from ending up in spam.
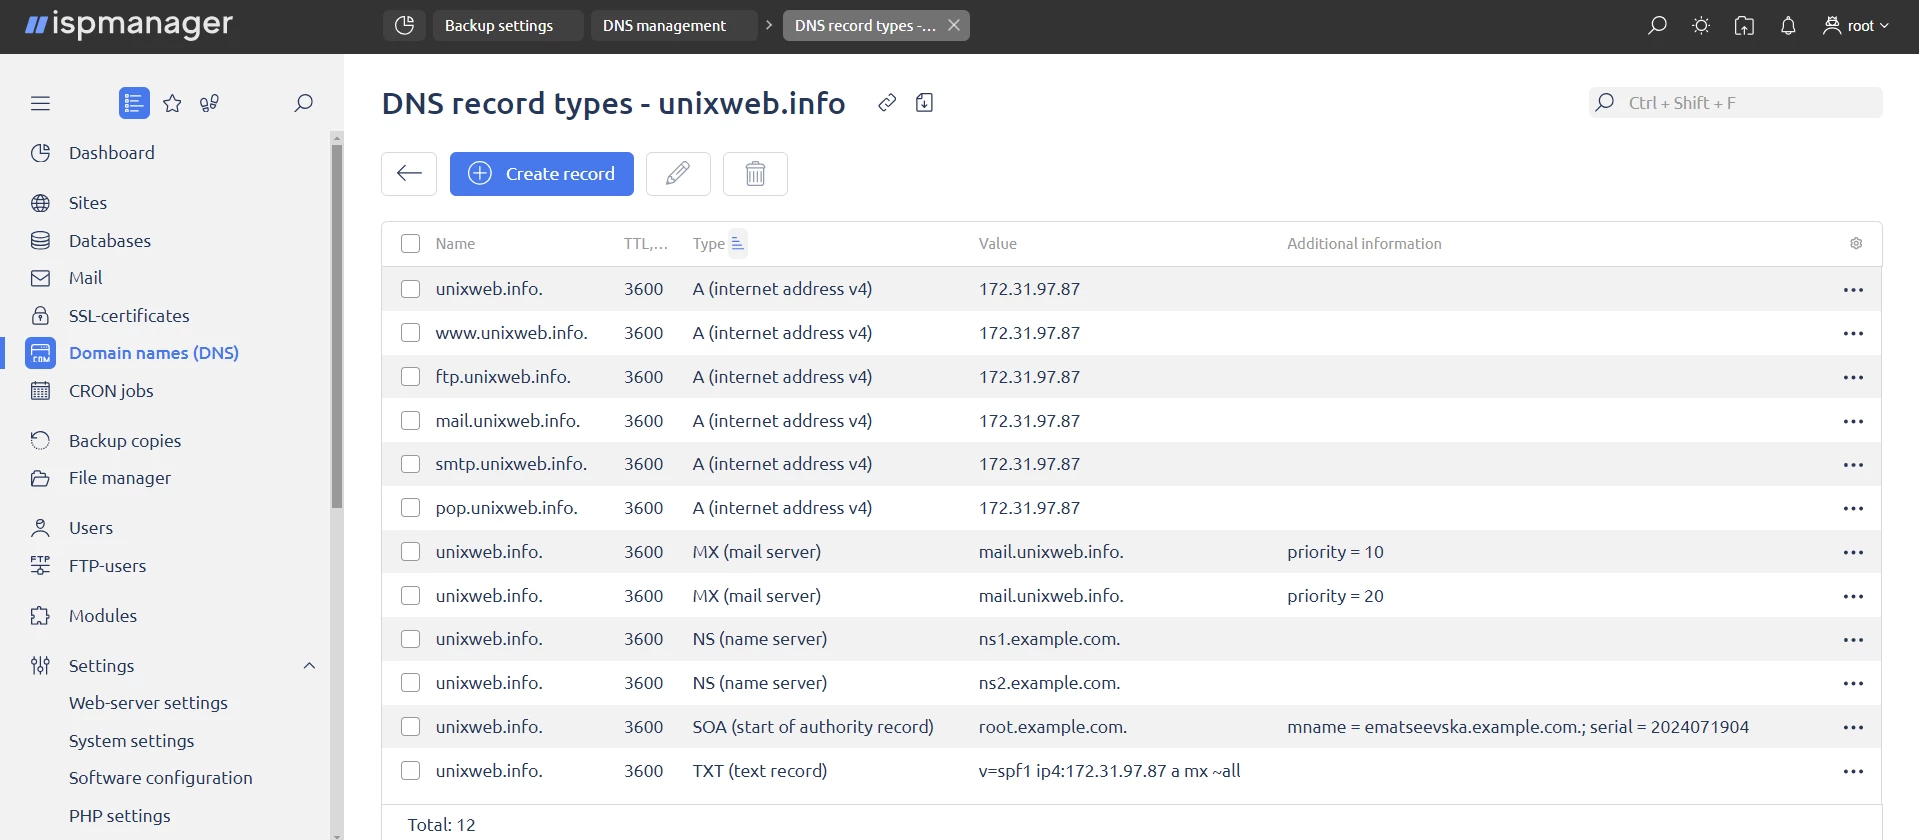
Configuring an A-Record. An Address Record is a type of DNS record that maps a domain name to an IPv4 address. It allows clients to find servers by domain name and connect to them by the corresponding IP address.
For the domain unixweb.info , you’ll want to create three A records: mail.unixweb.info , smtp.unixweb.info , imap.unixweb.info and pop.unixweb.info. We won’t go over the other A records, as they are not relevant here.
Example of A-record configuration. Assume that all three subdomains should point to the same IP address:
1.2.3.4.The A-record indicates the IP address of the server that will process mail messages. It’s typically used to configure a shared mail service:
mail.unixweb.info. IN A 1.2.3.4The A-record indicates the IP address of the SMTP server that is used to send mail. SMTP (Simple Mail Transfer Protocol) is a protocol for transmitting e-mail:
smtp.unixweb.info. IN A 1.2.3.4Create an A-record manually if you want to use this subdomain for the IMAP protocol.
The A-record indicates the IP address of the IMAP server that is used to retrieve mail. IMAP (Internet Message Access Protocol) allows clients to manage and synchronize emails on a mail server, storing them there instead of downloading them to a local computer:
imap.unixweb.info. IN A 1.2.3.4The A-record indicates the IP address of the POP server that is used to receive mail. POP3 (Post Office Protocol version 3) allows clients to download e-mails from a mail server to a local computer:
pop.unixweb.info. IN A 1.2.3.4Notes:
1. IP Address. Replace 1.2.3.4 with the actual IP address of your server.
2. NS records. Ensure you have the appropriate NS records for your domain.
3. TTL. The time to live (TTL) can be customized depending on your DNS record caching requirements.
A-record validation and testing. After configuring the A-records, you can verify that they are configured correctly from the command line:
dig A mail.unixweb.infoConfiguring an MX record. An MX record (Mail Exchange Record) is a type of DNS record that indicates which mail server accepts e-mail for your domain. It indicates the name of the server and its priority.
To set a high priority, specify a number with a lower value, that is, a server with a priority of 10 will be used before a server with a priority of 20.
MX records configuration example. Suppose you have one mail server installed on a VDS.
- Server name:
mail.unixweb.info - Priority:
10
unixweb.info. IN MX 10 mail.unixweb.info.In our case, we will not configure a backup mail server for the primary mail server, a single MX record is sufficient.
Notes:
1. FQDN. In MX records, specify the full domain name of the server with a dot at the end (for example mail.unixweb.info).
2. A-Records. Ensure that the A records for the mail.unixweb.info mail server are correct and point to the appropriate IP addresses.
3. TTL. The time to live (TTL) can be customized as per your DNS record caching requirements.
Verifying MX records. After configuring MX records, you can verify that you have done so correctly from the command line.
MX record:
dig MX unixweb.infoConfiguring an SPF record. An SPF (Sender Policy Framework) is a text record that is placed in the TXT record of a DNS domain. It helps prevent spam by only allowing certain mail servers to send email on behalf of your domain. The SPF record specifies a list of IP addresses or domains that are allowed to send mail on behalf of your domain.
Example of SPF record configuration. Suppose you want to allow mail from the following servers:
- Mail server with IP address:
1.2.3.4 - Server name:
mail.unixweb.info
unixweb.info. 3600 IN TXT "v=spf1 ip4:1.2.3.4 a mx ~all"Notes:
v=spf1 — SPF version. In our example, SPF version 1 is used.
ip4 1.2.3.4 — allowed to send mail from IP address 1.2.3.4
a — is allowed to send mail from any IP address associated with the A records (address records) of the domain unixweb.info
mx — allowed to send mail from any IP address associated with the MX records (mail exchange records) of the domain unixweb.info
-all — the strictest policy. It is recommended for use if you are sure the settings are right.
~all — a soft policy. Recommended for initial setup to track and debug mail sending.
+all — allows all servers, not recommended.
+?all — a neutral policy.
Verifying the SPF record. After configuring MX records, you can verify that they are configured correctly from the command line.
SPF entry:
dig TXT unixweb.infoConfiguring a DKIM record. DKIM (DomainKeys Identified Mail) is an email authentication method that allows an organization to take responsibility for emails sent using a cryptographic signature. Recipients can use DKIM to verify that the email has not changed since it was sent.
Example of DKIM record configuration. Suppose you want to allow mail signing for the following server:
Mail server name: mail.unixweb.info
DNS record:
dkim._domainkey 3600 IN TXT ("v=DKIM1; h=sha256; k=rsa; s=email; p=MIIBIjANBgkqhkiG9w0BAQEFAAOCAQ8AMIIBCgKCAQEAwLYjUqrNa5+…")Notes:
v=DKIM1. Indicates the DKIM version.
h=sha256. Indicates the hashing algorithm (SHA-256).
k=rsa. Indicates the key algorithm (RSA).
s=email. Specifies the service (email).
p=MIIBIj. Public key in base64 format that was generated by OpenDKIM.
Checking the DKIM record. After configuring the DKIM record, you can verify that it is configured correctly from the command line:
dig TXT dkim._domainkey.unixweb.infoConfiguring an rDNS record. An rDNS (reverse DNS) record associates an IP address with a domain name. It is used to authenticate mail servers and reduce spam.
To set up an rDNS record, you must contact your Internet Service Provider (ISP) or hosting provider, as they control the PTR records for your IP address.
Correctly configuring the DNS and rDNS records will ensure that your email gets delivered reliably and increase trust in your domain, preventing messages from going to spam.
Example rDNS entry configuration. Suppose you want to configure rDNS for the following server:
- Mail server with IP address:
1.2.3.4 - Domain name:
mail.unixweb.info
rDNS-запись:
4.3.2.1.in-addr.arpa. 3600 IN PTR mail.unixweb.info.Notes:
in-addr.arpa Domain zone, used for reverse IP address resolution.
PTR An entry type indicating the reverse resolution of an IP address.
3600 Time to Live (TTL) of the recording, measured in seconds.
1.2.3.4 IP address to be resolved back.
mail.unixweb.info The domain name to which the IP address points.
Verify and test the rDNS record. After setting up the rDNS record, you can verify that it is configured correctly from the command line:
dig -x 1.2.3.4Configuring smtp_banner. smtp_banner is a parameter in the Exim configuration that defines the message that is displayed when an SMTP connection is established. This is the message that clients see when they connect to your SMTP server.
Here are the steps to configure smtp_banner using the system hostname:
1. Set the system hostname. First, set the system hostname to the desired value. In this example, we’re using mail.unixweb.info:
sudo echo "mail.unixweb.info" > /etc/hostname && hostname mail.unixweb.infoThis command writes mail.unixweb.info to the file /etc/hostname which is used by the system to determine the hostname on boot. It then immediately applies this hostname to the current session using the hostname command.
2. Configure smtp_banner in Exim. You can then configure smtp_banner in Exim to display the hostname and ESMTP SendMail message. To do so, insert the following command:
sudo sed -i '18i\smtp_banner = "${primary_hostname} ESMTP SendMail"' /etc/exim4/exim4.conf.templateThis command inserts the line smtp_banner = "${primary_hostname} ESMTP SendMail" into line 18 of the file /etc/exim4/exim4.conf.template
3. Configure smtp_banner in Exim ispmanager template. To prevent the ispmanager template from overwriting the exim configuration, smtp_banner settings should be added. Then, we recommend running the following command:
sudo sed -i '14i\smtp_banner = "${primary_hostname} ESMTP SendMail"' /usr/local/mgr5/etc/templates/exim.config4. Restart Exim. After making changes to the Exim configuration, restart the Exim service to apply the changes:
sudo systemctl restart exim45. Check smtp_banner. To verify that smtp_banner is displayed correctly, establish a connection to the SMTP server on the local host (127.0.0.1) via port 25:
nc 127.0.0.1 25This command uses the nc (Netcat) utility to establish a connection to an SMTP server. You should see an SMTP banner displayed when the connection is established.
Important. Please note that you will need superuser privileges to run most of these commands. Be careful when working with system files and always make backups before making changes.
Spam protection
In this section, we will look at how to configure spam protection in ispmanager.
Discussion:
- Set up filters to block unwanted emails,
- Using tools to analyze and label spam,
- Methods for preventing it from spreading through your mail server.
Go to the "Mail" section and configure spam protection by clicking on the icon with three dots in the upper right corner, as shown in the image below.
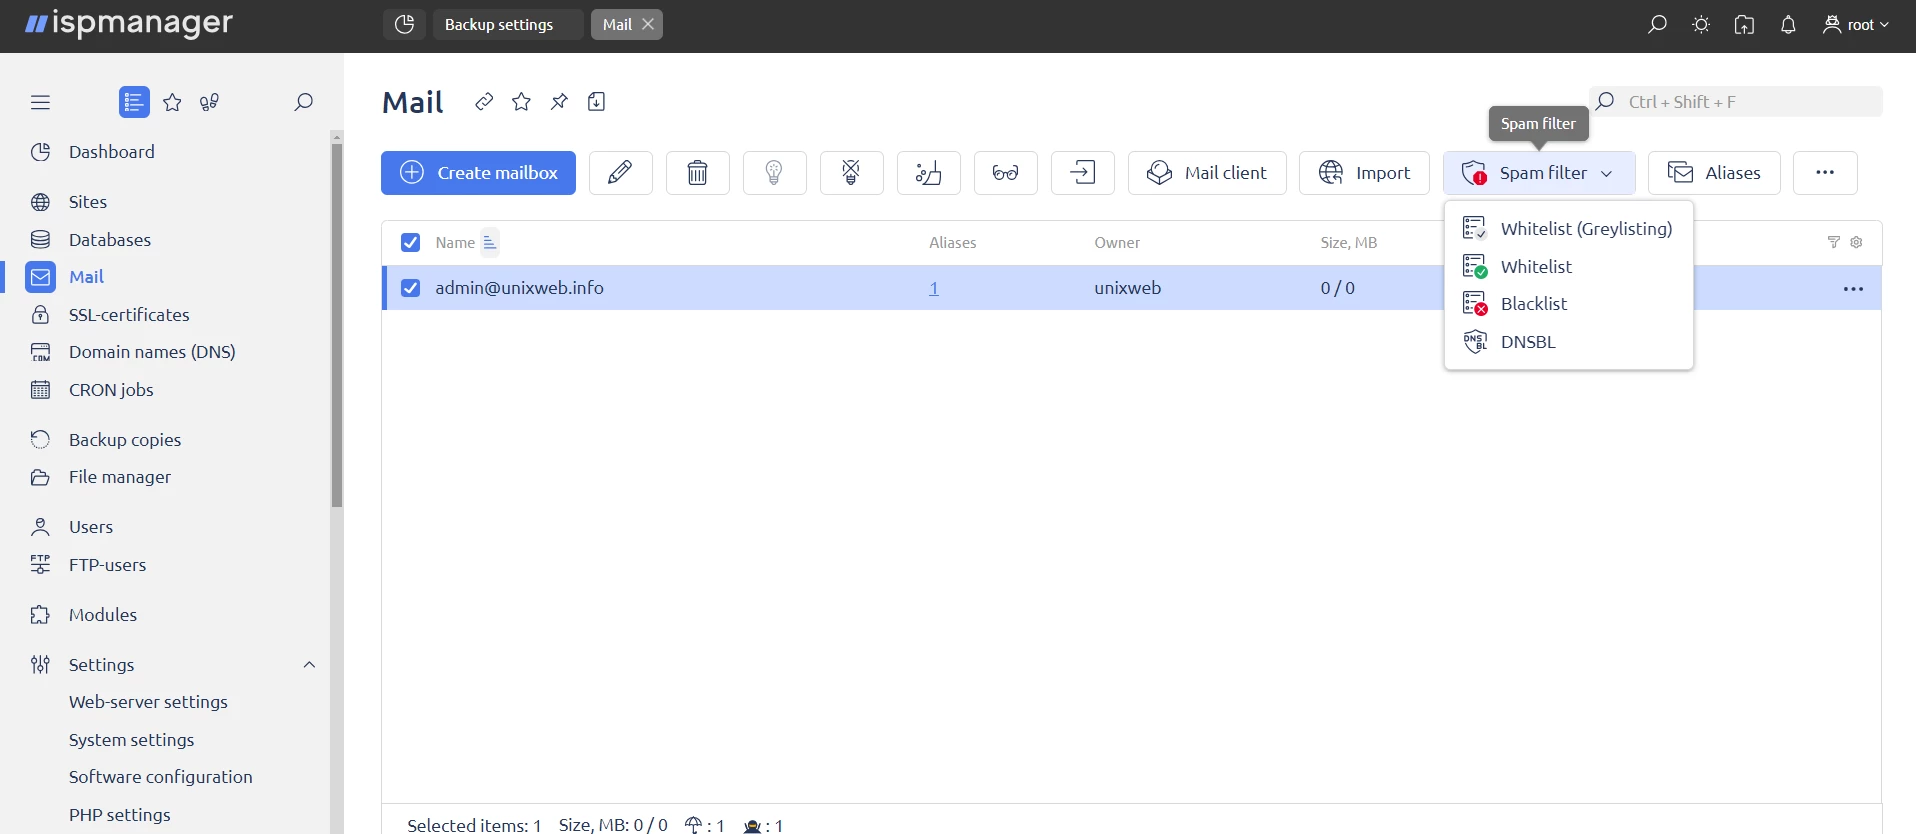
To configure mail server protection in ispmanager, the following are used:
Whitelist — allows you to add allowed senders. The server will only accept messages from them.
Whitelisting:
- Go to "Mail" → Click on the icon with three dots in the upper right corner → "Spam Protection" → "Whitelist".
- Enter the IP address, e-mail address, or domain name of the sender.
- Click "Create."
The whitelist is stored at /etc/exim4/whitelist
Blacklist — bans senders, their emails are always rejected.
Blacklisting:
- Go to "Mail" → Click on the icon with three dots in the upper right corner → "Spam Protection" → "Blacklist".
- Enter the IP address, e-mail address, or domain name of the sender.
- Click "Create."
The blacklist is stored at /etc/exim4/blacklist
DNSBL (DNS Blacklist) are lists of domains and IP addresses used to combat spam. Exim checks to see if the sender's email domain is in the DNSBL lists.
Adding a DNSBL list:
- Go to "Mail" → Click the icon with three dots in the upper right corner → "Spam Protection" → "DNSBL Filtering".
- Specify the address of the blacklist.
- Click "Create."
A list of DNSBLs is stored in /etc/exim4/blacklist
Greylisting is a tool that delays the acceptance of emails using temporary blocking. If an email comes from an unknown server, ispmanager asks the sender to resend it after some time.
Add a sender to the list of allowed senders:
- Go to "Spam Protection" → "Whitelisting (Greylisting)".
- Enter the IP address, e-mail address, or domain name of the sender.
The whitelist for Greylisting is stored in /etc/postgrey/whitelist_clients for Debian and Ubuntu.
SpamAssassin uses heuristics to identify spam. It evaluates emails based on various factors such as headers, text, and links.
We selected SpamAssassin during the installation of the mail server when we selected the checkboxes for the optional packages.
In the next article, we’ll cover how to test the mail server settings in the MxToolbox service, configure Firewall iptables and Fail2ban, create AppArmor profiles, and secure RoundCube.
- AppArmor — a mandated access control system, restricts application actions and prevents potential attacks and abuse.
- iptables — a tool for managing network connections and packet filtering, provides protection against unauthorized access.
- Fail2ban — a service that automatically blocks IP addresses that perform suspicious or malicious activities.