How to install the ispmanager control panel. Detailed guide: from setup to resolving common problems
We've put together all the information you need on how to install the ispmanager panel right here so you don't have to search through the documentation or forums looking for answers. We’ll also show you how to solve some of the common installation problems so that setting up ispmanager won’t take much time or effort.
- Preparing the server to install the panel
- Installing the ispmanager panel
- Logging in to the web interface of the ispmanager panel
- Common errors and what to do about them
Sometimes, problems can arise even before the panel is installed. For example, if there might not be enough RAM on the server or the OS version might be unsupported. Our checklist will help you avoid errors right at the start so first, check if everything is ready for installation.
What to do before installing the panel:
1. Rent a server or use your own. You can install the ispmanager control panel on a Linux server. If you don't have a server, you can rent one from a hosting provider, for example, an ispmanager partner. There is a list of partners on the ispmanager website →
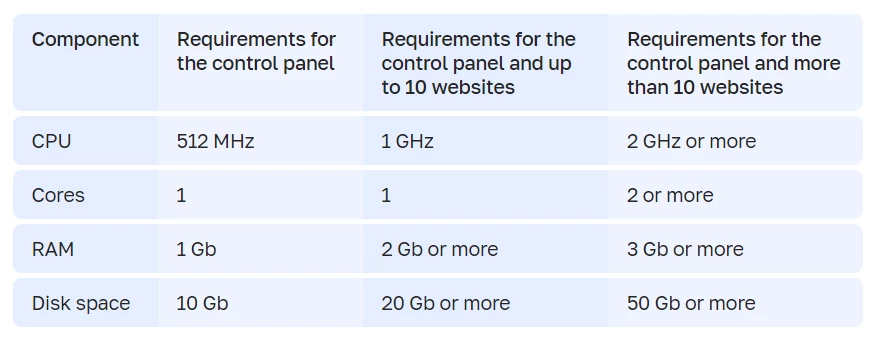
2. Check our system requirements for the server: ensure that there is enough RAM and free space for the panel to work.
System Requirements:
3. Ensure that the server is running the correct OS version.
The ispmanager panel supports:
- AlmaLinux 8, 9
- Debian 11, 12
- Ubuntu 20.04, 22.04, 24.04
- Rocky Linux 8
Now, start preparing the server and installing the panel by following the documentation, knowledge base, and ispmanager blog.
Preparing the server for panel installation
There should be no third-party programs or repositories on the server; for the panel to work properly, the server must be "clean".
How to prepare the server:
1. Connect to the server via SSH with root root privileges. For instructions on how to do so, see the ispmanager knowledge base →
2. Check that the server IP address is static. The panel may not work correctly on a dynamic IP address because the ispmanager license is bound to the server IP address.
You can check the server IP address with the command:
ip addr3. Install the utility wget:
4. Allow inbound and outbound connections to ports using the utility ufw:
For example, open port 80 with this command:
ufw allow 80Ports and their purposes:
- 21/tcp — to send data via FTP
- 22/tcp — for remote access to a server via SSH
- 110, 143, 993, 995, 587, 465, 25/tcp — to send and receive emails
- 80, 443/tcp — to handle user requests to websites on the server with ispmanager
- 1500/tcp — to access the ispmanager interface
- 1501/tcp — to run external applications via SSL
- 1501/tcp — 53/tcp, 53/udp — for domain name servers
- 1501/tcp — 3306/tcp — for remote access to the database server
Installing the ispmanager panel
Now you can install the panel. The process consists of seven steps and usually takes between 3 and 15 minutes.
1. Download the installation script:
wget https://download.ispmanager.com/install.sh -O install.sh2. Run the script:
sh install.sh3. Select the version for product updates.

- Beta has the latest changes from the testing phase
- Stable is the tested version of the product
How to change the repository →
4. Specify the version of the panel:
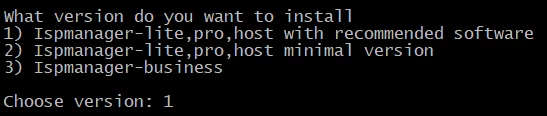
The differences between the versions ispmanager →
5. Installing the web server:

The tasks that Nginx + Apache and OpenLightSpeed web servers are suitable for →
6. Select the DBMS for the databases in the panel:

How to switch from SQLite to MySQL →
7. Wait for the panel to install. When the panel is ready, a notification will appear in the terminal:

8. Congratulations, the panel is installed. You are awesome =)
Login to the web-interface of the ispmanager panel
The last step of the installation process is to log in to the web-interface of the ispmanager panel and sign the license agreement.
1. Go to this link in your browser
https://server IP address:1500/ispmgrWhat the link looks like:
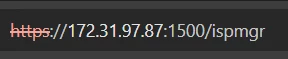
The browser will display an “insecure connection” error. This is normal because the panel address is not protected by an SSL certificate. Ignore the error and follow the link to the web interface.
How to protect the panel address with an SSL certificate →
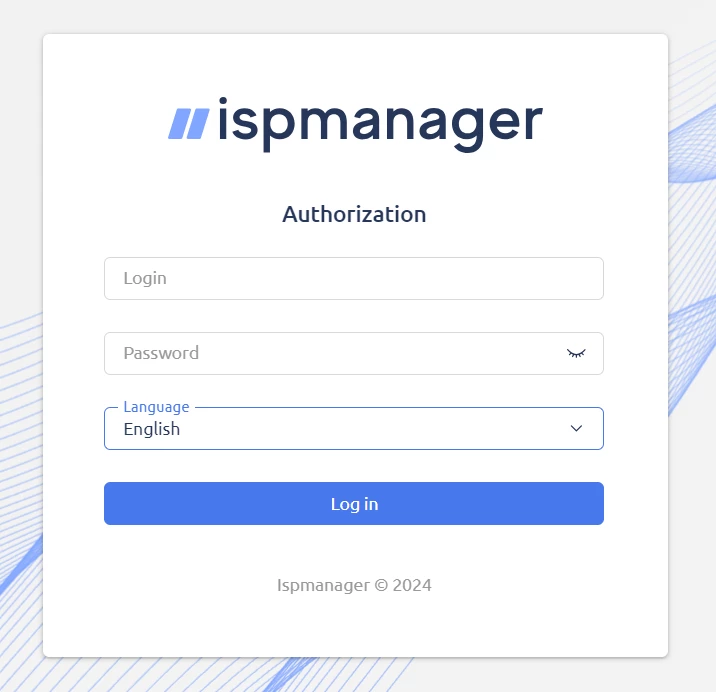
2. Specify root in the "Login" field.
3. Enter the root password of the server in the "Password" field.
4. Click "Sign in."
What the authorization window looks like:
5. Sign the license agreement.
6. Done.
Common errors and what to do about them
We asked our tech support about the most common problems that arise when installing the ispmanager panel. Here’s what can go wrong and how to fix it.
AppArmor is enabled on your server. Can not install with AppArmor.
This happens because AppArmor is enabled on the server. To fix the error, disable AppArmor
Disable it with the commands:
aa-teardownsystemctl stop apparmorsystemctl disable apprmorAnd run the installation again
You have incorrect hostname.
his happens because the server hostname is incorrect. To fix it, run this script with the key:
--ignore-hostname
What the team looks like:
sh install.sh --ignore-hostnameThe panel license was not automatically activated. For details on how to solve the problem, see the ispmanager blog →